> ## Documentation Index
> Fetch the complete documentation index at: https://docs.tryreason.dev/llms.txt
> Use this file to discover all available pages before exploring further.
# Quickstart
> Learn the fundamentals in 10 minutes
This guide is designed for those with a basic understanding of Large Language Models (LLMs). If you're new to LLMs, please start with [this introduction first](/docs/llm-101).
## Installation
Let's begin by creating your first RΞASON application. Execute the following command:
```bash npm theme={null}
npx use-reason
```
```bash pnpm theme={null}
pnpx use-reason
```
```bash yarn theme={null}
yarn create use-reason
```
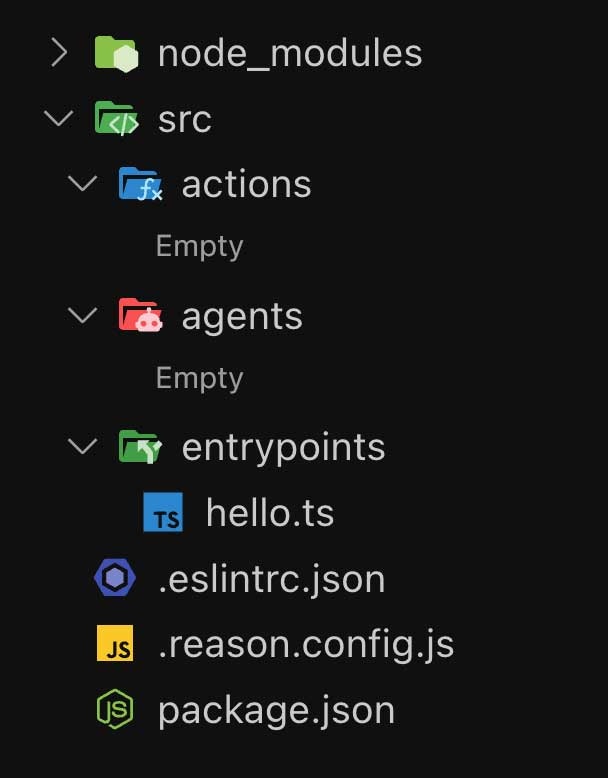
This will initialize a RΞASON project. Your project's directory structure will be as follow:
## Directory structure
Let's understand how a RΞASON project is structured:
* `src/entrypoints`: Is where all your entrypoints (routes) are defined. We'll talk more about entrypoints [below](link.to).
* `src/entrypoints/hello.ts`: An accessible entrypoint (route/endpoint) at [http://localhost:1704/hello](http://localhost:1704/hello).
* `.eslintrc.json`: ESLint configuration file used to configure the RΞASON ESLint plugin.
* `.reason.config.js`: Configuration file for RΞASON, to set your OpenAI Key and default model, amongst other things.
* `src/actions`: Is where all your actions are defined. We talk more about actions [here](link.to).
* `src/agents`: Is where all your agents are defined. We talk more about agents [here](link.to).
### File-based system
RΞASON uses a *file-based system* that is heavily inspired by [Next.js](https://nextjs.org/docs/getting-started/installation#creating-directories) for defining three important pieces of your app:
* [Entrypoints](link.to)
* [Agents](link.to)
* [Actions](link.to)
This means that all `.ts` files created under `/entrypoints`, `/agents` and `/actions` will be respectively treated as entrypoints, agents or actions.
For instance, if you want to create a new entrypoint called `qa-agent` you just need to create the file `/entrypoints/qa-agent.ts`.
When you run `npx use-reason`, the project that is created for you has no agents & actions, but it has a single entrypoint `/entrypoints/hello.ts` — which is what we'll explore now.
## Running your app
### Setting your API Key
If you didn't add your OpenAI API key during the initial setup, you should do it now:
Go into `.reason.config.js` and add your key there:
```js theme={null}
const config = {
projectName: 'my-reason-app',
openai: {
key: '', // 👈 API Key goes here
defaultModel: 'gpt-3.5-turbo'
},
}
export default config
```
With your API Key added, go ahead and launch your RΞASON project using:
```bash npm theme={null}
npm run dev
```
```bash pnpm theme={null}
pnpm run dev
```
```bash yarn theme={null}
yarn dev
```
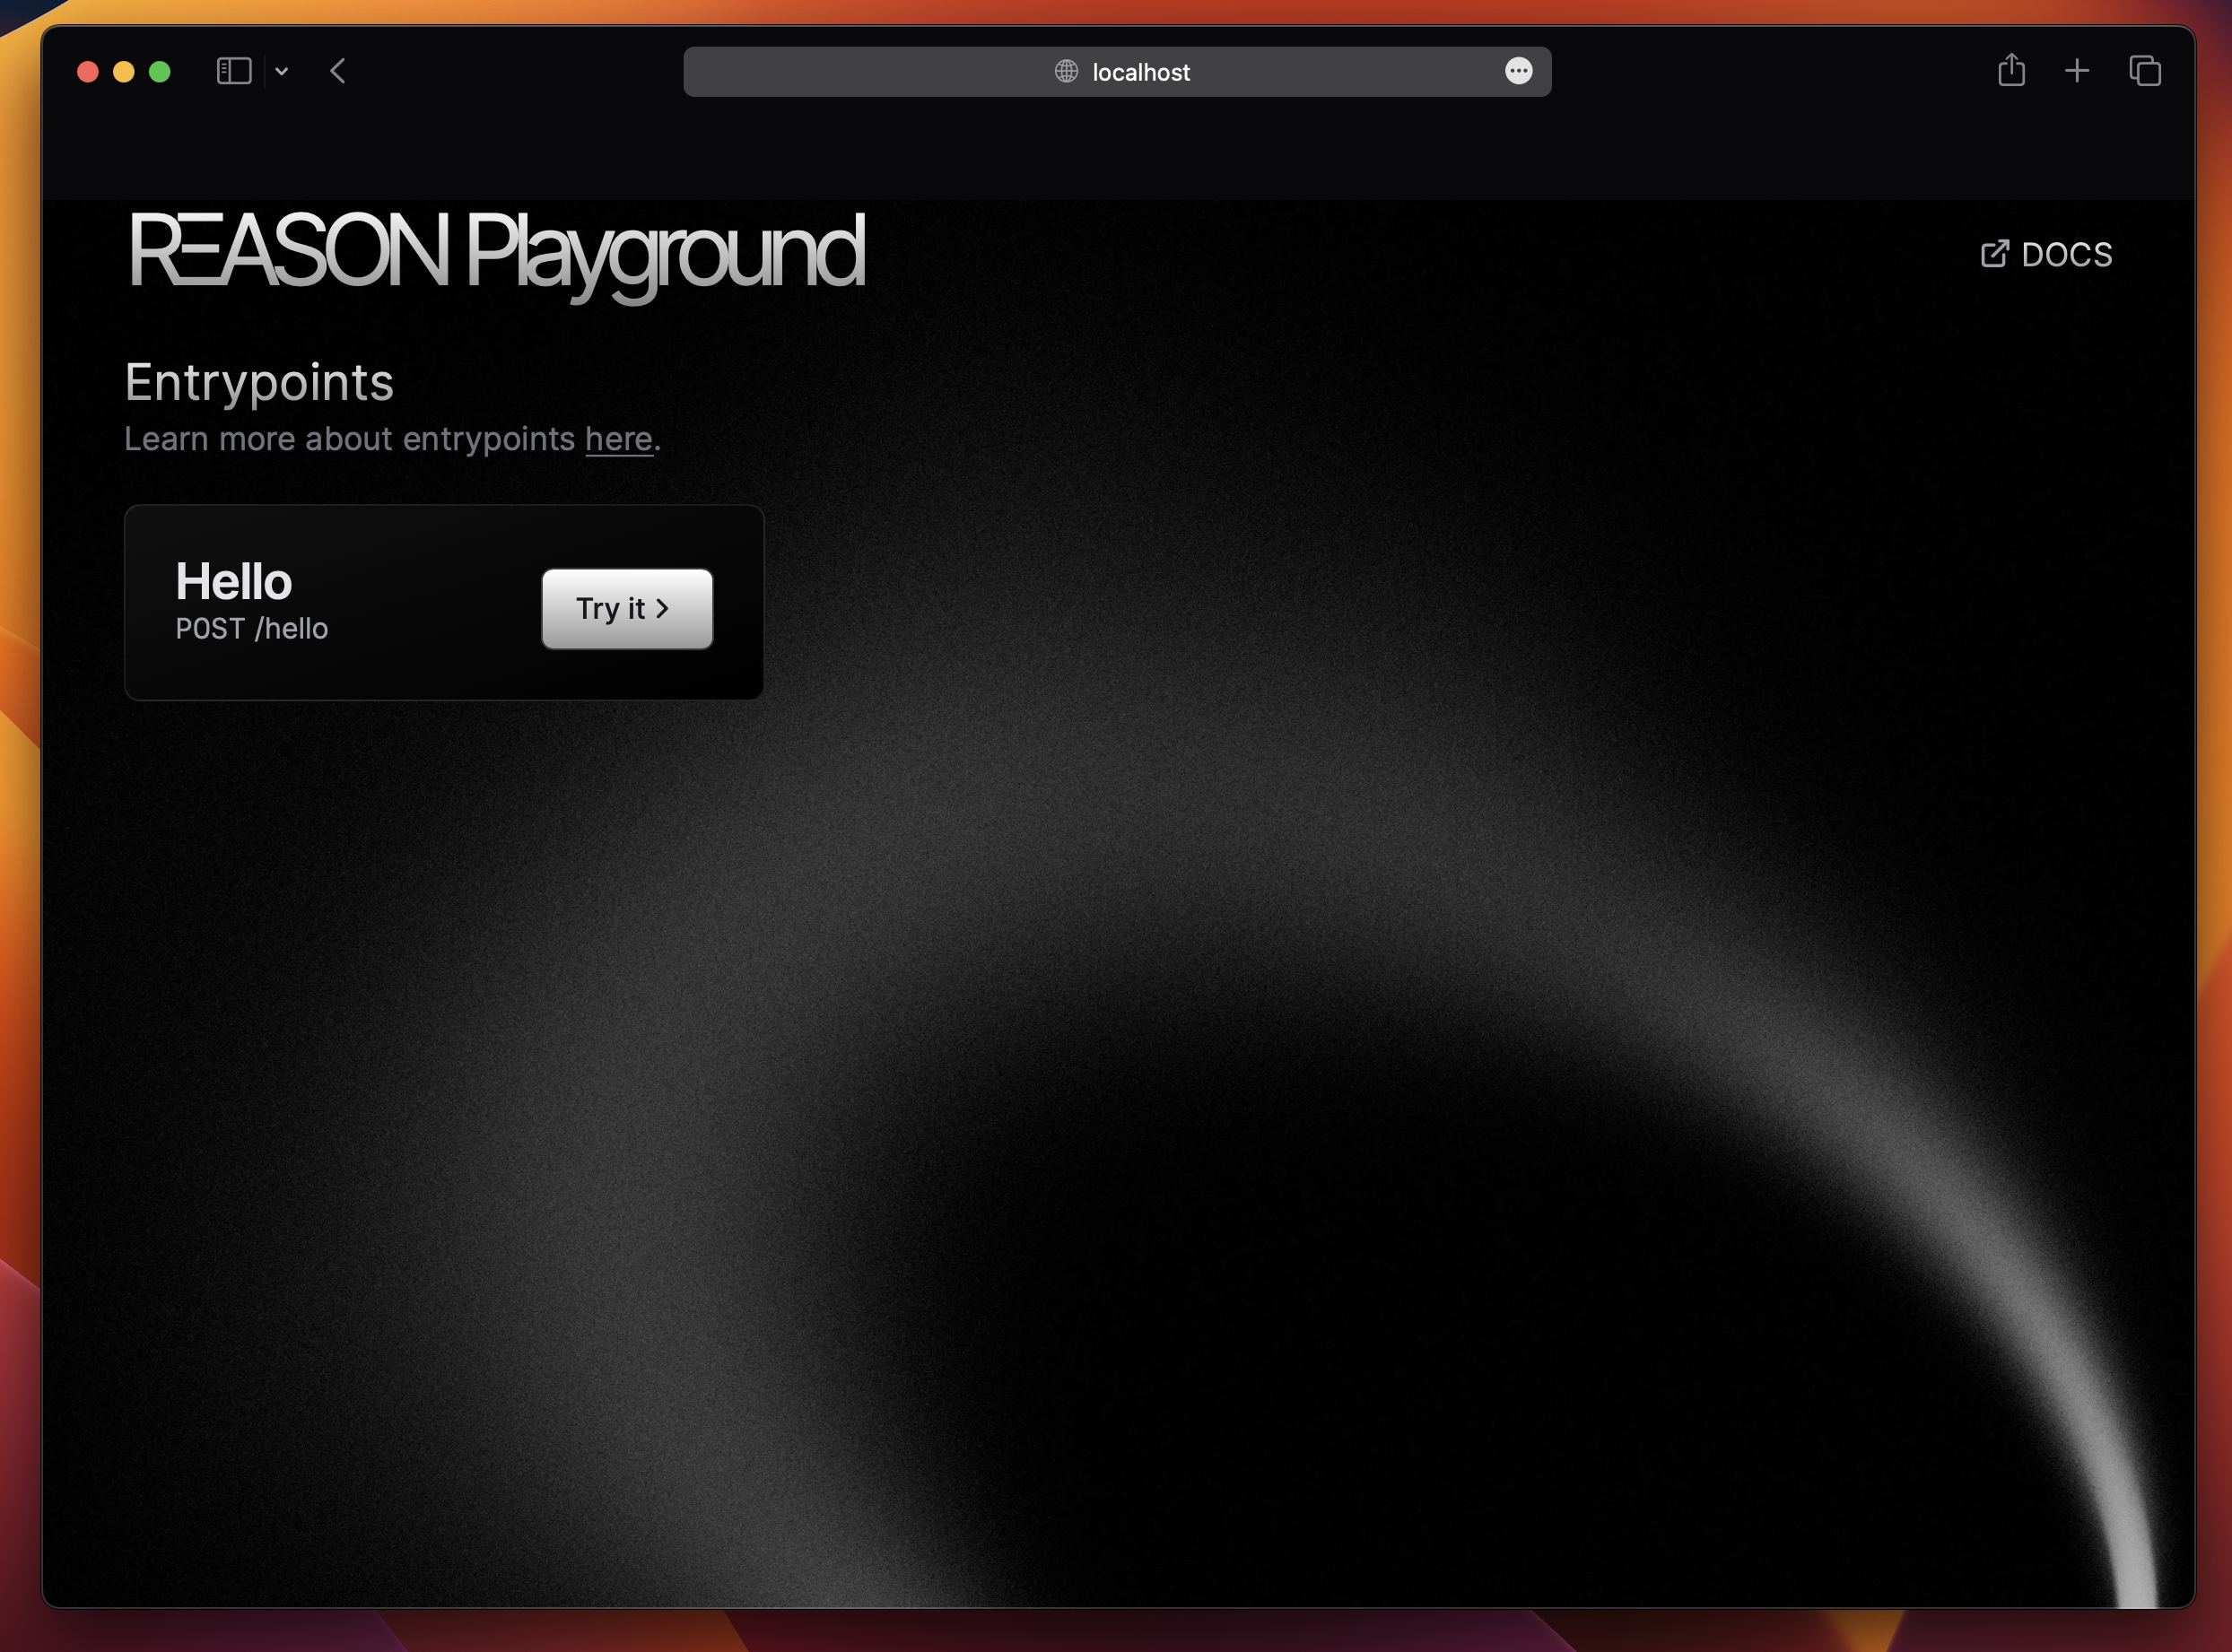
After executing the command, RΞASON will start and the [RΞASON Playground](link.to) will automatically open in your browser:
 ### RΞASON Playground
The [RΞASON Playground](link.to) is a web tool for testing your entrypoints. You can make requests and see their outputs.
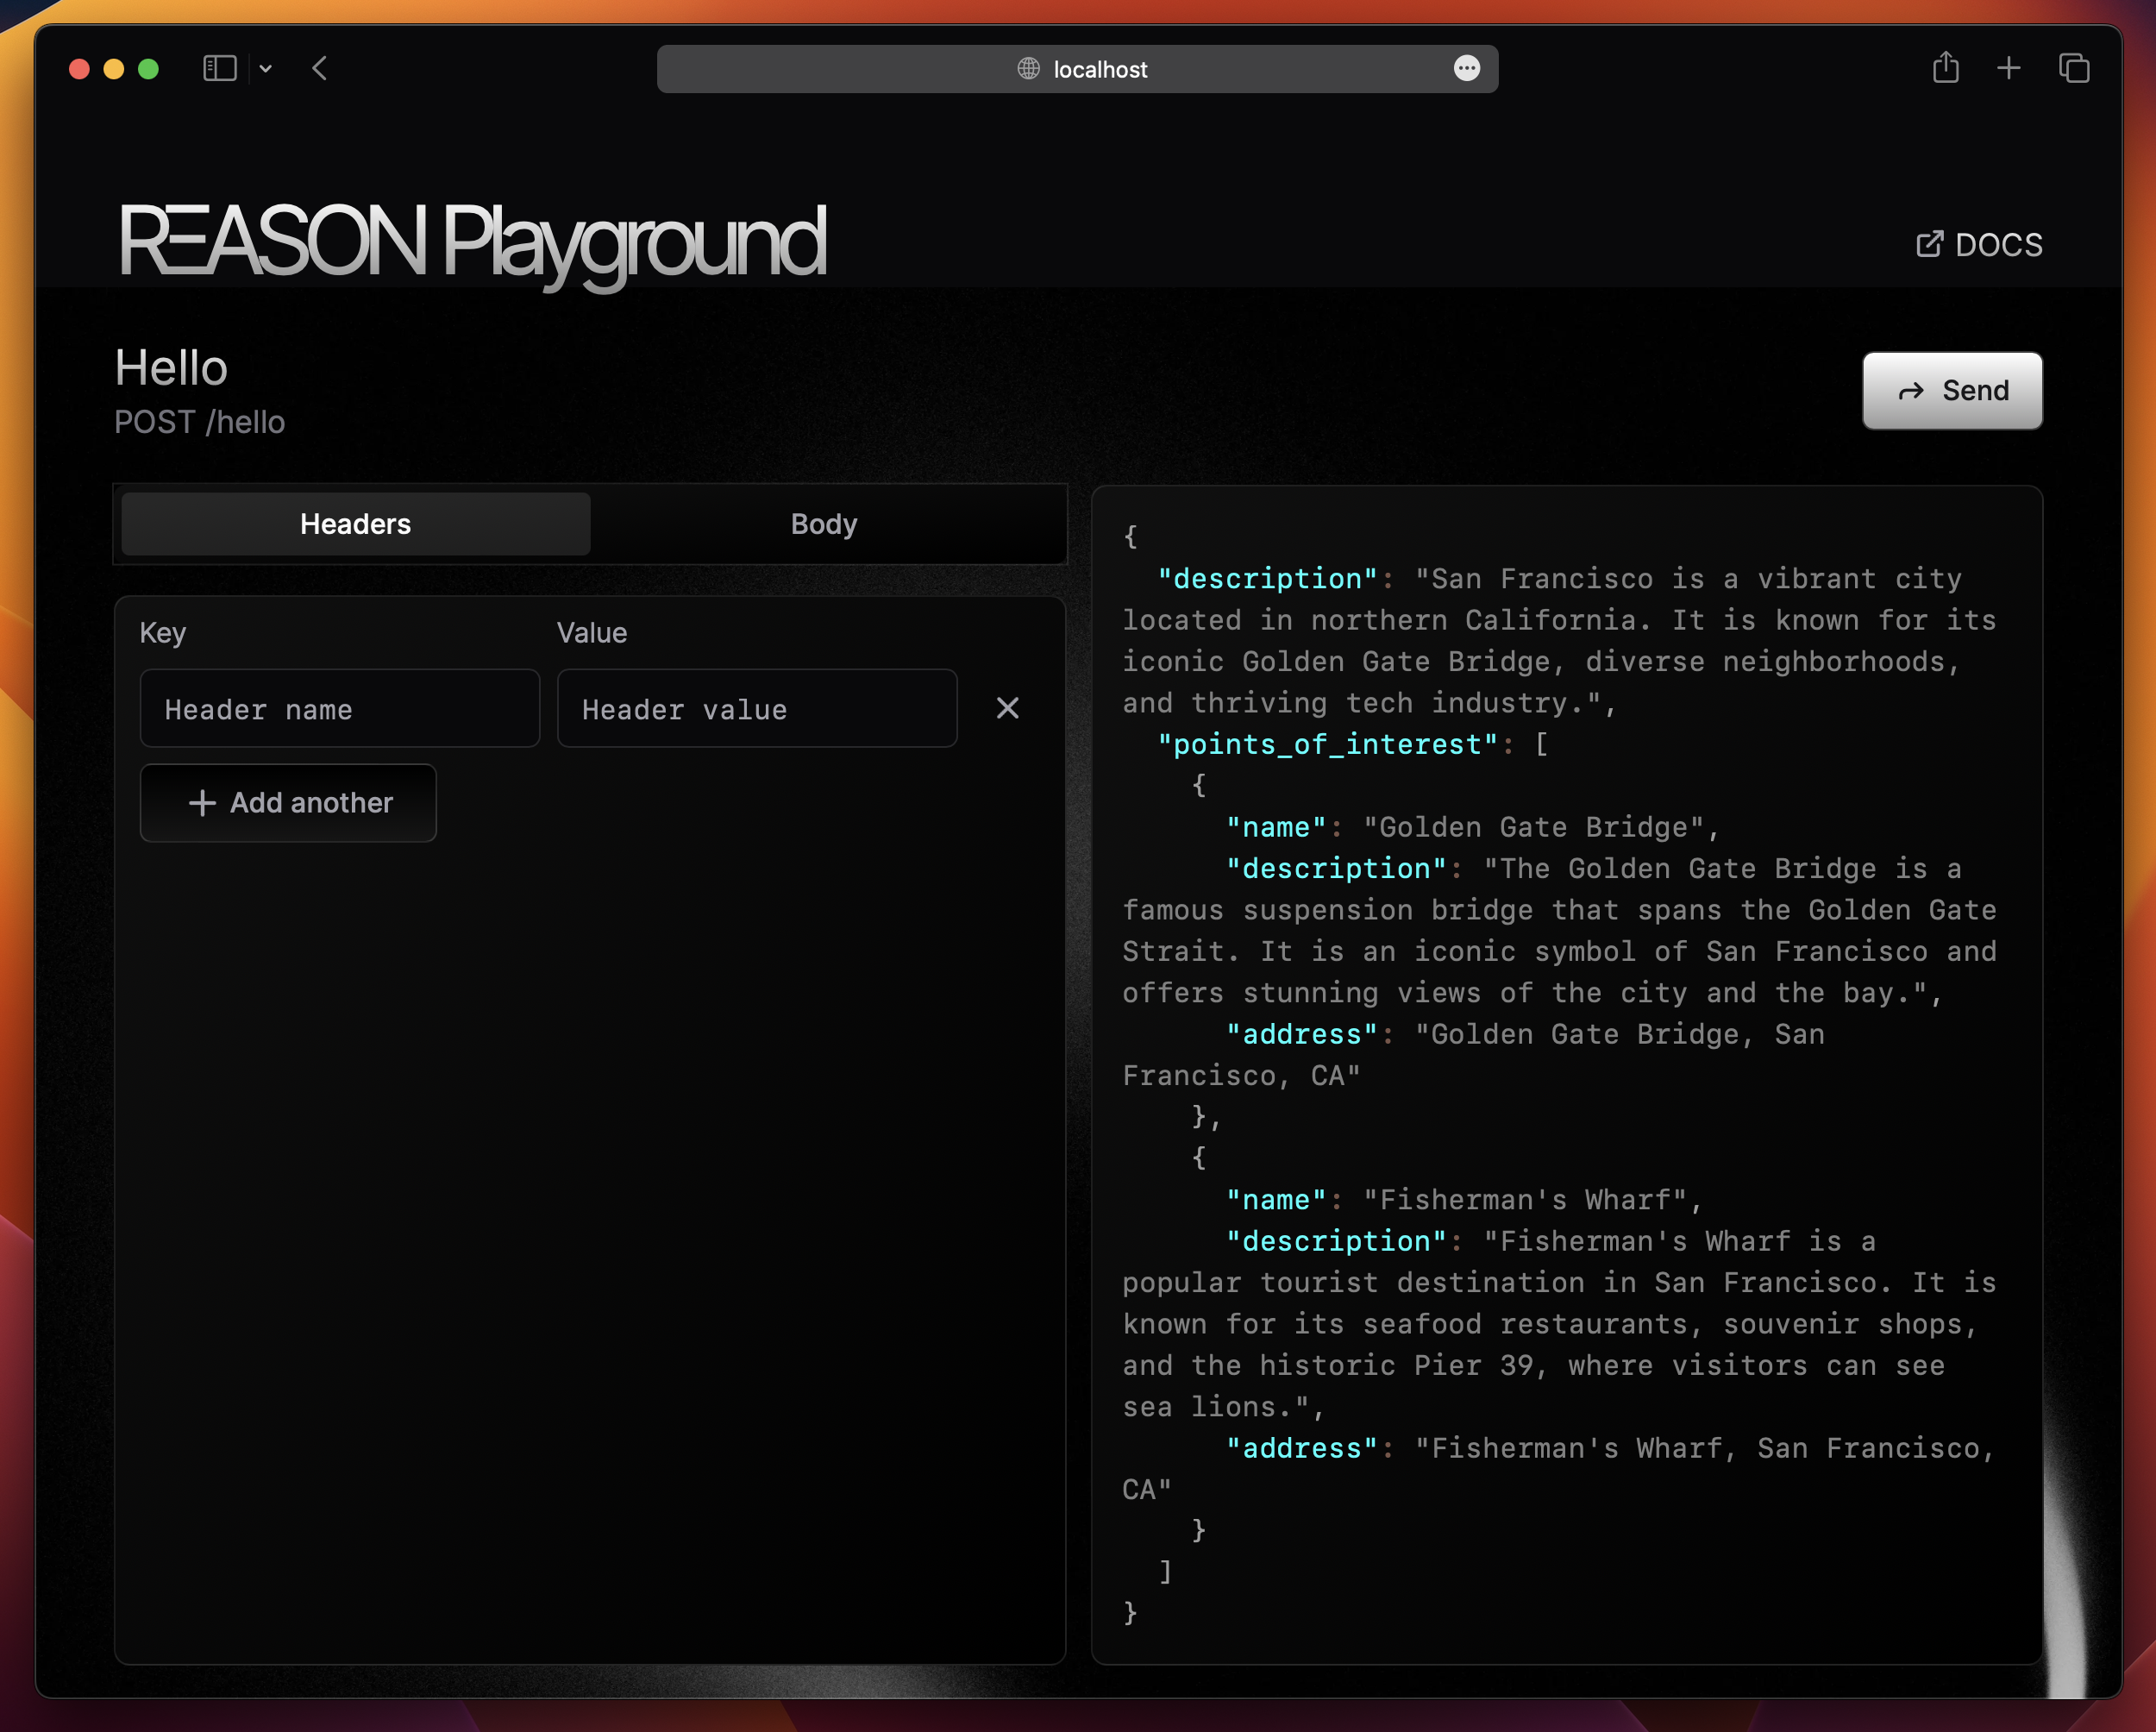
With the RΞASON Playground open, navigate to the `hello` entrypoint and send a request. You will see something like:
### RΞASON Playground
The [RΞASON Playground](link.to) is a web tool for testing your entrypoints. You can make requests and see their outputs.
With the RΞASON Playground open, navigate to the `hello` entrypoint and send a request. You will see something like:
### Because: streaming!
*Almost all* LLM apps should stream their responses back to the client and most HTTP API testing tools simply do not support HTTP streaming — either completly (i.e.: simply not showing the response) or partially (i.e.: by waiting for the stream to finish to then show to the user the response).
Since testing is an integral part of creating a great end-user experience and the mission behind RΞASON is to allow developers to make great LLM apps, creating a Playground became a necessity.
***
**However**, even if HTTP streaming were to be added in, for example, Postman, the Playground would still be needed. Why?
Because, *by default*, **RΞASON streams to the client in its own encoding format**.
This may seem weird but we have a pretty good reason for it. We go in-depth about it [here](link.to).
As you can see above, the `POST /hello` entrypoint returns a JSON object with some cool points of interest about the city you are located at. How does it work?
## The basics
Whenever a request is made to `POST` [http://localhost:1704/hello](http://localhost:1704/hello), the `entrypoints/hello.ts` file is called and the function `POST()` is executed. Here's how the file looks:
```ts src/entrypoints/hello.ts theme={null}
import { reasonStream } from 'tryreason'
interface City {
/** A two sentence description of the city */
description: string;
points_of_interest: {
name: string;
description: string;
address: string;
}[];
}
export async function* POST(req: Request) {
const res = await fetch(`http://ip-api.com/json/`)
if (res.status !== 200) {
return new Response('Error', { status: 500 })
}
const { city } = await res.json()
return reasonStream(`Tell me about ${city}`)
}
```
Let’s break it down:
* `export async function* POST() {}`
1. `POST()`: We are defining that this function is responsible for handling `POST` requests;
2. `function*`: By adding `*` we are telling RΞASON this function returns a streaming response;
* `await fetch('http://ip-api.com/json/')` fetches the user's location from their IP address;
* `reasonStream('Tell me about ${city}')`
1. `reasonStream()` is a RΞASON function that prompts a LLM and streams the response;
2. `'Tell me about ${city}'` is the prompt passed to the LLM;
3. `reasonStream`: By passing an `interface` to `reasonStream()`, RΞASON ensures the response conforms to the `City` interface structure. More details [here](docs/introduction#rksason-and-typescript).
* JSDoc comment: The `/** A two sentence description of the city */` comment is passed directly to the LLM along your prompt. You can think of it as the prompt for the property that the comment is above (in this case, the `description` property).
Have you ever noticed that some functions have a description when you hover over them?
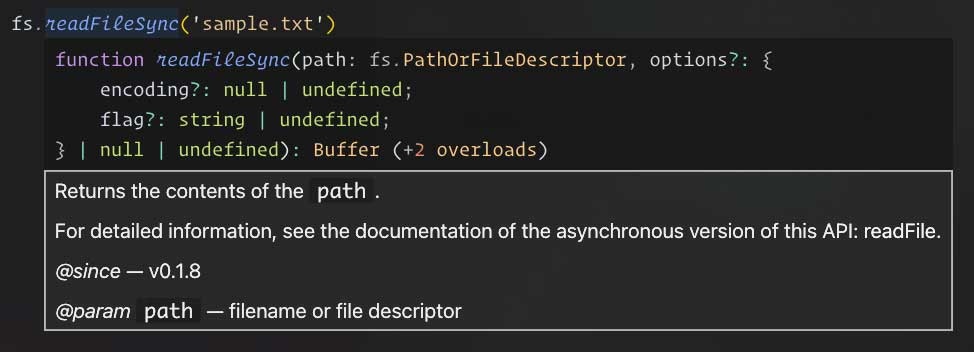 Well, the way those are defined is through JSDoc! Let's take a peek at the `fs.readFileSync()` definition:
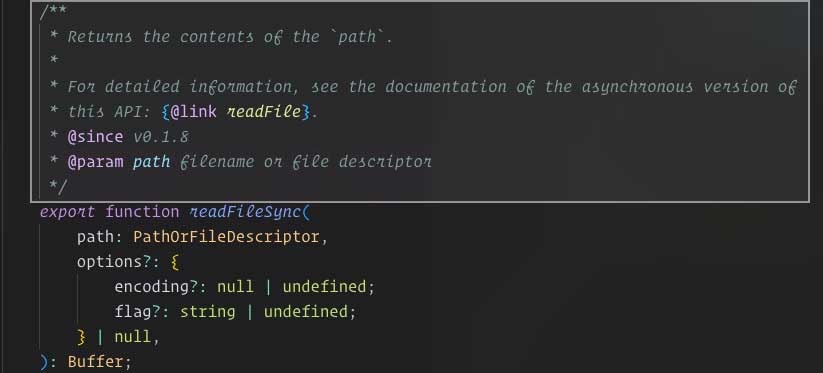 As you may have noticed, JSDoc comment are not like normal code comments:
1. They need to be defined as `/** comment */`;
2. Your IDE uses them to show code hints — showing them when you hover (and some other times);
3. And RΞASON uses them as part of your prompt to the LLM.
We'll learn more about them [here](link.to).
While this might seem complex, the core functionality lies in the `reason()` and `reasonStream()` functions, which we'll explore more in-depth [later](docs/essentials/reason).
Next, we'll modify the `hello` entrypoint to enhance its functionality.
# Spicing it up
Let's imagine we are building a website that a user can acess and get cool places to visit in the city he's currently in. Cool! We already have the backend for it in the `/hello` entrypoint.
However, what if we want to pin the points of interest in an actual map? Since the `address` property is just a string this would be a bit hard.
### Extending `City` interface
But what if we extended the `address` property to have latitude & longitude as well?
```ts src/entrypoints/hello.ts theme={null}
interface City {
// ...
points_of_interest: {
// ...
address: { // 👈 now its an object (was a string)
address_line: string;
latitude: string;
longitude: string;
};
}[];
}
export async function* POST() {
// ...
return reasonStream(`Tell me about ${city}`)
}
```
Now if we make a request to `POST /hello` using the Playground we should see the new `address` property:
As you may have noticed, JSDoc comment are not like normal code comments:
1. They need to be defined as `/** comment */`;
2. Your IDE uses them to show code hints — showing them when you hover (and some other times);
3. And RΞASON uses them as part of your prompt to the LLM.
We'll learn more about them [here](link.to).
While this might seem complex, the core functionality lies in the `reason()` and `reasonStream()` functions, which we'll explore more in-depth [later](docs/essentials/reason).
Next, we'll modify the `hello` entrypoint to enhance its functionality.
# Spicing it up
Let's imagine we are building a website that a user can acess and get cool places to visit in the city he's currently in. Cool! We already have the backend for it in the `/hello` entrypoint.
However, what if we want to pin the points of interest in an actual map? Since the `address` property is just a string this would be a bit hard.
### Extending `City` interface
But what if we extended the `address` property to have latitude & longitude as well?
```ts src/entrypoints/hello.ts theme={null}
interface City {
// ...
points_of_interest: {
// ...
address: { // 👈 now its an object (was a string)
address_line: string;
latitude: string;
longitude: string;
};
}[];
}
export async function* POST() {
// ...
return reasonStream(`Tell me about ${city}`)
}
```
Now if we make a request to `POST /hello` using the Playground we should see the new `address` property:
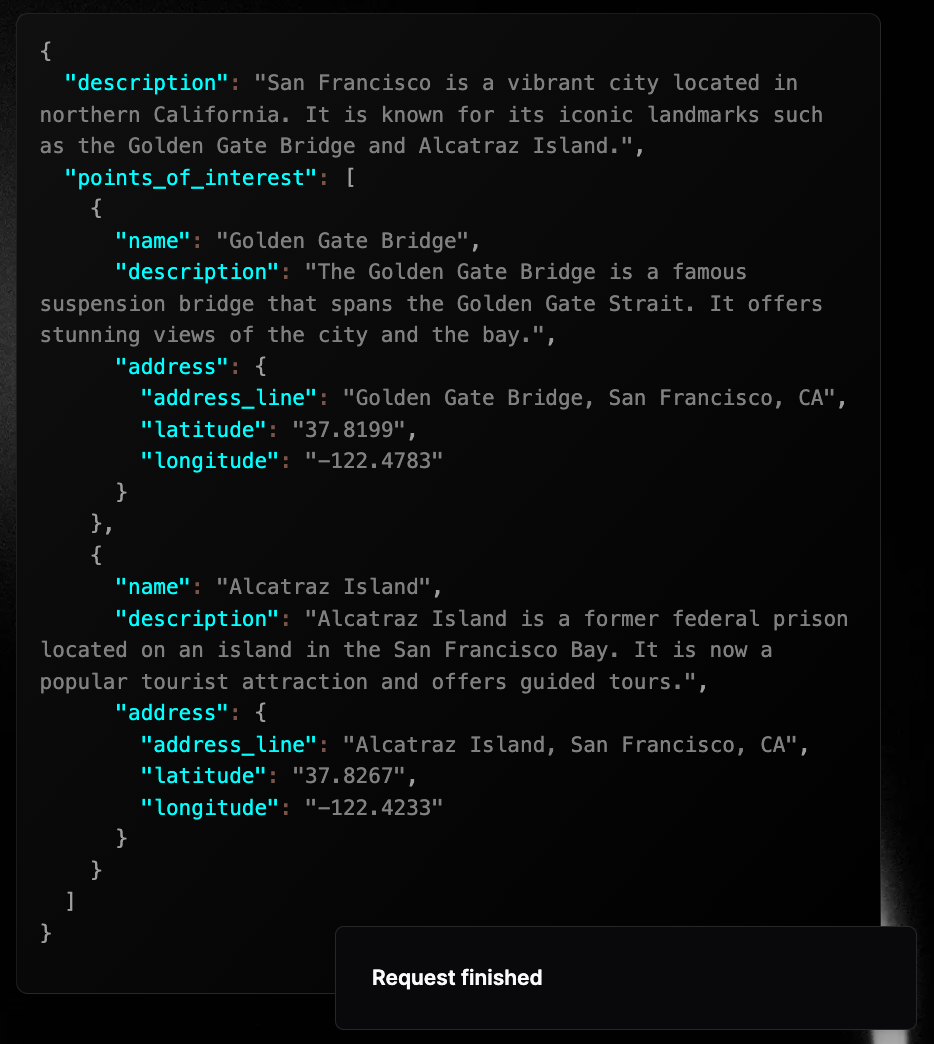 Awesome! As you can see, by just changing the interface we pass to `reasonStream()` we change the output as well.
This was just an example, in reality, getting the latitude & longitude from a LLM is *probably* not the best idea ever.
***
### Taking up a notch
Now let's say we want to return the distance from the user to the point of interest — something like: "Golden Gate Bridge is 12km away from you".
Since we already have the latitude & longitude of the points of interest, if we could just get the longitude & latitude from the user, calculing the distance would be trivial...
Luckly for us the HTTP request we're already making to `http://ip-api.com/json/` returns that as well!
```json Response from http://ip-api.com/json/ theme={null}
{
"status": "success",
// ....
"city": "San Francisco",
"lat": 37.7739, // 👈 latitude here!
"lon": -122.4312, // 👈 longitude here!
// ...
}
```
Awesome! So we can get the latitude & longitude from the response of `http://ip-api.com/json/`:
```ts src/entrypoints/hello.ts theme={null}
import { reasonStream } from 'tryreason'
interface City {
// ...
}
export async function* POST(req: Request) {
const res = await fetch(`http://ip-api.com/json/`)
if (res.status !== 200) {
return new Response('Error', { status: 500 })
}
const { city, lat, lon } = await res.json() // 👈 getting the longitude & latitude
// ...
}
```
Now it just a matter of calculing the distance from two pairs of latitude & longitude. To calculate it, we can use the [Haversine formula](https://www.perplexity.ai/search/what-is-the-Oy_vI9RBSEykxhaS_3PrcA?s=c).
Let's create a new [action](link.to) at `src/actions/getDistance.ts` that will calculate the distance for us:
```ts src/actions/getDistance.ts theme={null}
// 👇 Haversine formula (bunch of math stuff)
export default function getDistance(lat1: number, lon1: number, lat2: number, lon2: number) {
const R = 6371e3
const latRad1 = lat1 * Math.PI / 180
const latRad2 = lat2 * Math.PI / 180
const deltaLatRad = (lat2 - lat1) * Math.PI / 180
const deltaLonRad = (lon2 - lon1) * Math.PI / 180
const a = Math.sin(deltaLatRad / 2) * Math.sin(deltaLatRad / 2) +
Math.cos(latRad1) * Math.cos(latRad2) *
Math.sin(deltaLonRad / 2) * Math.sin(deltaLonRad / 2)
const c = 2 * Math.atan2(Math.sqrt(a), Math.sqrt(1 - a))
return R * c // Distance in meters
}
```
Cool! So far we have:
* the latitude & longitude of the user and points of interest;
* and a function that calculates the distance between two pairs of latitude/longitude (in meters).
What we need now to do is:
1. call the `getDistance()` function for each point of interest to get the distance of the user from that location;
2. somehow return the distance in the streaming response of the `POST /hello` entrypoint.
In order to do that, we'll need to use `reasonStream()` as an actual generator — which is somewhat advanced and may look complicated, but we'll over it step-by-step in the [next page](/docs/essentials/reason-stream).
### Iterating through `reasonStream()`
`reasonStream()` is an [async generator](https://developer.mozilla.org/en-US/docs/Web/JavaScript/Reference/Global_Objects/AsyncGenerator) — which means there is **much more** we can do with it othen than directly return it (which is what we are doing now).
We can, for instance:
```ts theme={null}
interface City {
description: string;
}
async function* POST() {
for await (const city of reasonStream('Tell me about New York')) {
console.log(city)
}
}
```
Which will log the following:
```json theme={null}
{ description: StreamableObject { value: null, done: false } }
{ description: StreamableObject { value: 'New', done: false } }
{ description: StreamableObject { value: 'New York', done: false } }
{ description: StreamableObject { value: 'New York is a state', done: false } }
{
description: StreamableObject {
value: 'New York is a state in the northeastern',
done: false
}
}
{
description: StreamableObject {
value: 'New York is a state in the northeastern United States.',
done: true
}
}
```
As you can see, the `description` property was filled overtime.
Import to note that while we specified in our `City` interface a single `description` property that is a string, `reasonStream` returned a object that has `done` & `value`. These are called `StreamableObject` and we'll go [in-depth in them later](/docs/essentials/reason-stream#streamableobjects).
For now, what is important to know is that every property that you specified in your interface will be wrapped in a `{ done: boolean, value: actualValue }`.
For instance, `description: string` became an object with `{ done: boolean, value: string }`.
### Calling `getDistance()`
Now that we know how to iterate through `reasonStream()`, let's take a step back and remember our current problem.
We now want to return the distance from the user to the point of interest — something like: *"Golden Gate Bridge is 12km away from you"*. For that we have:
* created a `getDistance()` function that uses the [Haversine formula](https://www.perplexity.ai/search/what-is-the-Oy_vI9RBSEykxhaS_3PrcA?s=c) to calculate the distance between two pairs of latitude/longitude.
* got the user's latitude/longitude from the [ip-api](https://ip-api.com/) API.
* got each point of interest's latitude/longitude from the LLM itself.
What we need now to do is:
1. call the `getDistance()` function for each point of interest to get the distance of the user from that location;
* by iterating through `reasonStream()`, we can check whenever a `point_of_interest` has had its `latitude` & `longitude` returned and then calculate the distance from that to the user's latitude/longitude.
2. somehow return the distance in the streaming response of the `POST /hello` entrypoint.
* each iteration of `reasonSream()`, we'll stream back the value `reasonStream()` yielded to us — eventually, when we calculate the distance of each `point_of_interest`, we'll stream that as well.
Let's do it! *Again, this may look complicated now, but we'll go through each step in-depth in the following doc page*.
```ts src/entrypoints/hello.ts theme={null}
import { reasonStream } from 'tryreason'
import getDistance from '../actions/getDistance'
interface City {
/** A two sentence description of the city */
description: string;
points_of_interest: {
name: string;
description: string;
address: {
address_line: string;
latitude: number;
longitude: number;
};
}[];
}
export async function* POST() {
const res = await fetch(`http://ip-api.com/json/`)
if (res.status !== 200) {
return new Response('Error', { status: 500 })
}
const { city, lat, lon } = await res.json()
// 👇 New code is all here
for await (const cityInformation of reasonStream(`Tell me about ${city}`)) {
if (cityInformation.points_of_interest.value) {
/* 👆 We need to first check if the LLM has started returning
the points_of_interest (by checking if its not null) */
for (let point_of_interest of cityInformation.points_of_interest.value) {
// 👆 Loop through each point of interest
if (point_of_interest?.value?.address?.done) {
/* 👆 Check if the LLM has fully finished returning
the address property.
We do this because we only want to calculate the distance
when the address has been fully returned from the LLM. */
const poiLatitude = point_of_interest.value.address.value.latitude.value
const poiLongitude = point_of_interest.value.address.value.longitude.value
point_of_interest.value.distance = getDistance(lat, lon, poiLatitude, poiLongitude)
/* 👆 We add a new property to the point_of_interest called `distance`
that represents the distance from the user in meters */
}
}
}
yield cityInformation
/* 👆 Whenever we yield a value in an entrypoint
that value is immediatly streamed back to the client.
So here we're just streaming cityInformation. */
}
}
```
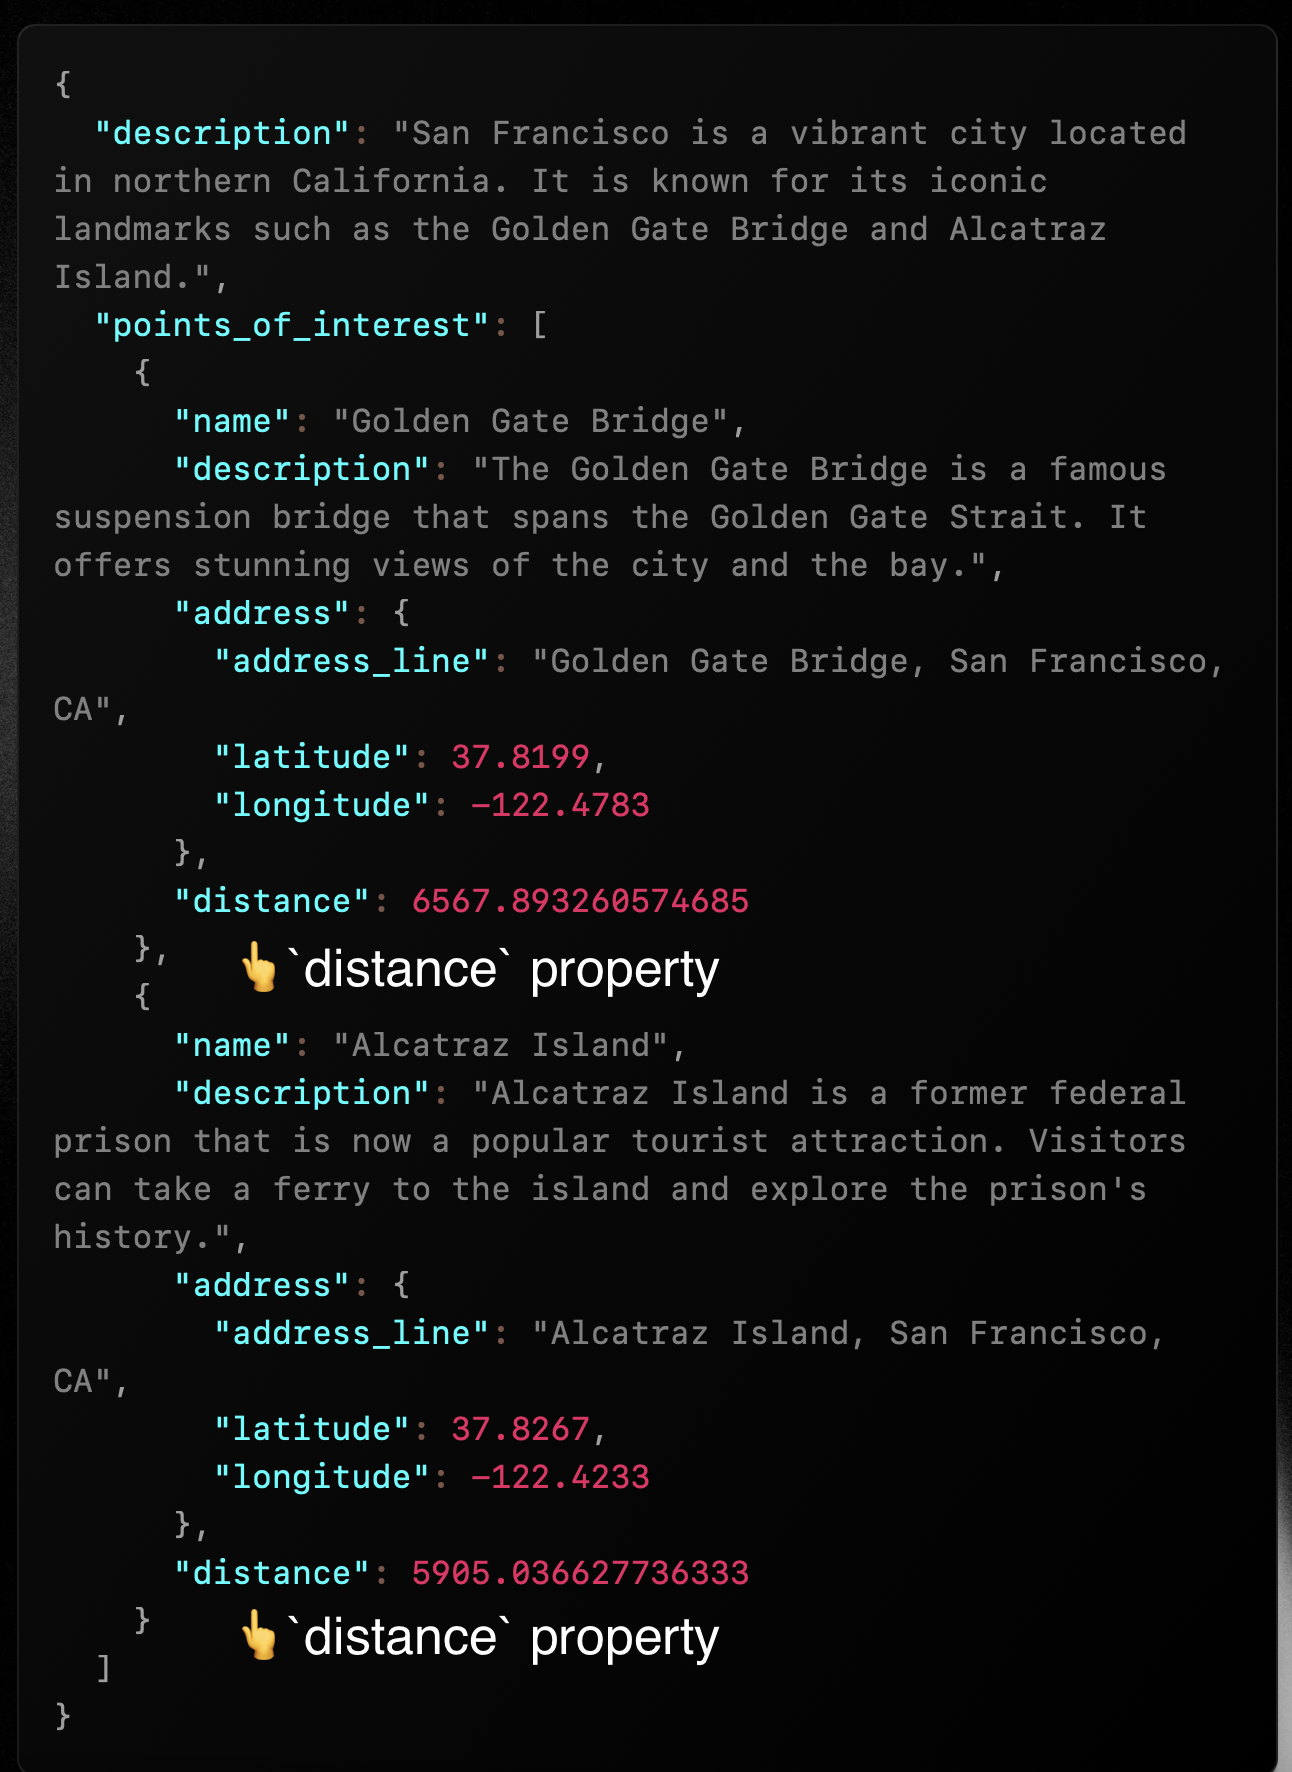
And here's the output:
Awesome! As you can see, by just changing the interface we pass to `reasonStream()` we change the output as well.
This was just an example, in reality, getting the latitude & longitude from a LLM is *probably* not the best idea ever.
***
### Taking up a notch
Now let's say we want to return the distance from the user to the point of interest — something like: "Golden Gate Bridge is 12km away from you".
Since we already have the latitude & longitude of the points of interest, if we could just get the longitude & latitude from the user, calculing the distance would be trivial...
Luckly for us the HTTP request we're already making to `http://ip-api.com/json/` returns that as well!
```json Response from http://ip-api.com/json/ theme={null}
{
"status": "success",
// ....
"city": "San Francisco",
"lat": 37.7739, // 👈 latitude here!
"lon": -122.4312, // 👈 longitude here!
// ...
}
```
Awesome! So we can get the latitude & longitude from the response of `http://ip-api.com/json/`:
```ts src/entrypoints/hello.ts theme={null}
import { reasonStream } from 'tryreason'
interface City {
// ...
}
export async function* POST(req: Request) {
const res = await fetch(`http://ip-api.com/json/`)
if (res.status !== 200) {
return new Response('Error', { status: 500 })
}
const { city, lat, lon } = await res.json() // 👈 getting the longitude & latitude
// ...
}
```
Now it just a matter of calculing the distance from two pairs of latitude & longitude. To calculate it, we can use the [Haversine formula](https://www.perplexity.ai/search/what-is-the-Oy_vI9RBSEykxhaS_3PrcA?s=c).
Let's create a new [action](link.to) at `src/actions/getDistance.ts` that will calculate the distance for us:
```ts src/actions/getDistance.ts theme={null}
// 👇 Haversine formula (bunch of math stuff)
export default function getDistance(lat1: number, lon1: number, lat2: number, lon2: number) {
const R = 6371e3
const latRad1 = lat1 * Math.PI / 180
const latRad2 = lat2 * Math.PI / 180
const deltaLatRad = (lat2 - lat1) * Math.PI / 180
const deltaLonRad = (lon2 - lon1) * Math.PI / 180
const a = Math.sin(deltaLatRad / 2) * Math.sin(deltaLatRad / 2) +
Math.cos(latRad1) * Math.cos(latRad2) *
Math.sin(deltaLonRad / 2) * Math.sin(deltaLonRad / 2)
const c = 2 * Math.atan2(Math.sqrt(a), Math.sqrt(1 - a))
return R * c // Distance in meters
}
```
Cool! So far we have:
* the latitude & longitude of the user and points of interest;
* and a function that calculates the distance between two pairs of latitude/longitude (in meters).
What we need now to do is:
1. call the `getDistance()` function for each point of interest to get the distance of the user from that location;
2. somehow return the distance in the streaming response of the `POST /hello` entrypoint.
In order to do that, we'll need to use `reasonStream()` as an actual generator — which is somewhat advanced and may look complicated, but we'll over it step-by-step in the [next page](/docs/essentials/reason-stream).
### Iterating through `reasonStream()`
`reasonStream()` is an [async generator](https://developer.mozilla.org/en-US/docs/Web/JavaScript/Reference/Global_Objects/AsyncGenerator) — which means there is **much more** we can do with it othen than directly return it (which is what we are doing now).
We can, for instance:
```ts theme={null}
interface City {
description: string;
}
async function* POST() {
for await (const city of reasonStream('Tell me about New York')) {
console.log(city)
}
}
```
Which will log the following:
```json theme={null}
{ description: StreamableObject { value: null, done: false } }
{ description: StreamableObject { value: 'New', done: false } }
{ description: StreamableObject { value: 'New York', done: false } }
{ description: StreamableObject { value: 'New York is a state', done: false } }
{
description: StreamableObject {
value: 'New York is a state in the northeastern',
done: false
}
}
{
description: StreamableObject {
value: 'New York is a state in the northeastern United States.',
done: true
}
}
```
As you can see, the `description` property was filled overtime.
Import to note that while we specified in our `City` interface a single `description` property that is a string, `reasonStream` returned a object that has `done` & `value`. These are called `StreamableObject` and we'll go [in-depth in them later](/docs/essentials/reason-stream#streamableobjects).
For now, what is important to know is that every property that you specified in your interface will be wrapped in a `{ done: boolean, value: actualValue }`.
For instance, `description: string` became an object with `{ done: boolean, value: string }`.
### Calling `getDistance()`
Now that we know how to iterate through `reasonStream()`, let's take a step back and remember our current problem.
We now want to return the distance from the user to the point of interest — something like: *"Golden Gate Bridge is 12km away from you"*. For that we have:
* created a `getDistance()` function that uses the [Haversine formula](https://www.perplexity.ai/search/what-is-the-Oy_vI9RBSEykxhaS_3PrcA?s=c) to calculate the distance between two pairs of latitude/longitude.
* got the user's latitude/longitude from the [ip-api](https://ip-api.com/) API.
* got each point of interest's latitude/longitude from the LLM itself.
What we need now to do is:
1. call the `getDistance()` function for each point of interest to get the distance of the user from that location;
* by iterating through `reasonStream()`, we can check whenever a `point_of_interest` has had its `latitude` & `longitude` returned and then calculate the distance from that to the user's latitude/longitude.
2. somehow return the distance in the streaming response of the `POST /hello` entrypoint.
* each iteration of `reasonSream()`, we'll stream back the value `reasonStream()` yielded to us — eventually, when we calculate the distance of each `point_of_interest`, we'll stream that as well.
Let's do it! *Again, this may look complicated now, but we'll go through each step in-depth in the following doc page*.
```ts src/entrypoints/hello.ts theme={null}
import { reasonStream } from 'tryreason'
import getDistance from '../actions/getDistance'
interface City {
/** A two sentence description of the city */
description: string;
points_of_interest: {
name: string;
description: string;
address: {
address_line: string;
latitude: number;
longitude: number;
};
}[];
}
export async function* POST() {
const res = await fetch(`http://ip-api.com/json/`)
if (res.status !== 200) {
return new Response('Error', { status: 500 })
}
const { city, lat, lon } = await res.json()
// 👇 New code is all here
for await (const cityInformation of reasonStream(`Tell me about ${city}`)) {
if (cityInformation.points_of_interest.value) {
/* 👆 We need to first check if the LLM has started returning
the points_of_interest (by checking if its not null) */
for (let point_of_interest of cityInformation.points_of_interest.value) {
// 👆 Loop through each point of interest
if (point_of_interest?.value?.address?.done) {
/* 👆 Check if the LLM has fully finished returning
the address property.
We do this because we only want to calculate the distance
when the address has been fully returned from the LLM. */
const poiLatitude = point_of_interest.value.address.value.latitude.value
const poiLongitude = point_of_interest.value.address.value.longitude.value
point_of_interest.value.distance = getDistance(lat, lon, poiLatitude, poiLongitude)
/* 👆 We add a new property to the point_of_interest called `distance`
that represents the distance from the user in meters */
}
}
}
yield cityInformation
/* 👆 Whenever we yield a value in an entrypoint
that value is immediatly streamed back to the client.
So here we're just streaming cityInformation. */
}
}
```
And here's the output:
***
## Bonus section: Observability
If you are curious about how observability works in RΞASON, feel free to explore this section. However, if you're not feeling going through observability now: no problem! We'll be going through it in-depth [later](link.to).
### What is observability?
Observability refers to the ability to monitor & understand the internals of a software system — it's crucial for detecting & diagnosing issues.
In the context of LLM app development, observability is **even more relevant**. That's because LLMs part of building a great LLM app is, *at least*, 80% trying new prompts, new RAG pipelines, different agent behaviours, etc.
RΞASON follows the [OpenTelemetry](https://www.perplexity.ai/search/im-a-developer-wz6N7e5WTqq6WOSgqJreHw?s=c) standard. The OpenTelemetry is a open standard for obversability that prevents vendor lock-in and interops with a bunch of different tools — allowing **you** to choose the best tool for you.
### Why OpenTelemetry is a big deal?
OpenTelemetry is a standard in the industry, having your app data in it, means you can use **any tool you want** to monitor your app. You are not locked-in into whatever tool RΞASON supports or into depending that RΞASON integrates with a provider you want to use.
If you already have data pipelines configured, you don't need to change a single thing. Your RΞASON app data will automatically work there too.
### How to use it
There are a bunch of tools that integrate with OpenTelemetry data — both free & paid. You can use whichever you prefer. However, by default RΞASON uses [Zipkin](https://zipkin.io/): a free open-source tracing tool developed by Twitter.
What if you don't want to use Zipkin? This is covered in the Obvsersability page [here](link.to).
You just need to start a Zipkin instance to access your observability data — don't need to change a thing in RΞASON. And the easies way to start Zipkin is through Docker:
```bash Starting Zipkin theme={null}
docker run -d -p 9411:9411 openzipkin/zipkin:2.23
```
You can now access Zipkin at [http://localhost:9411/zipkin/](http://localhost:9411/zipkin/):
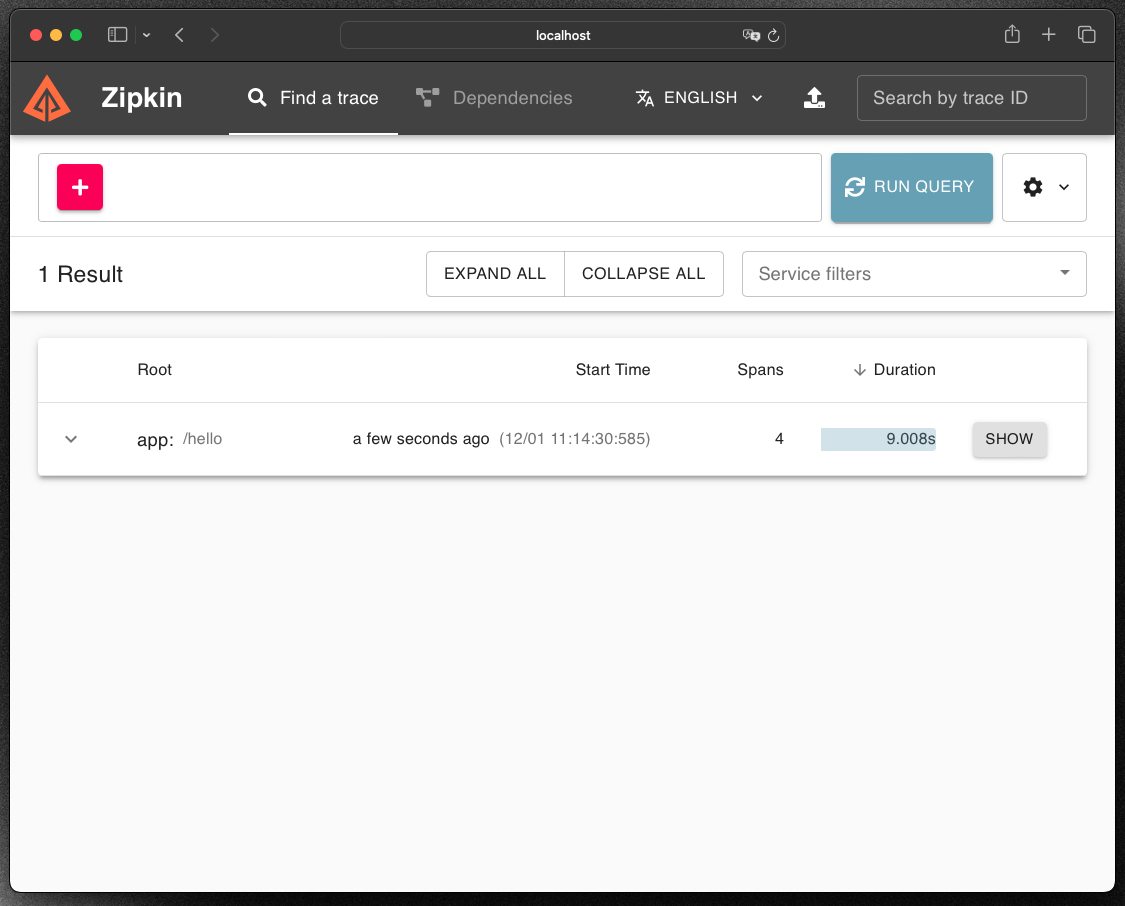
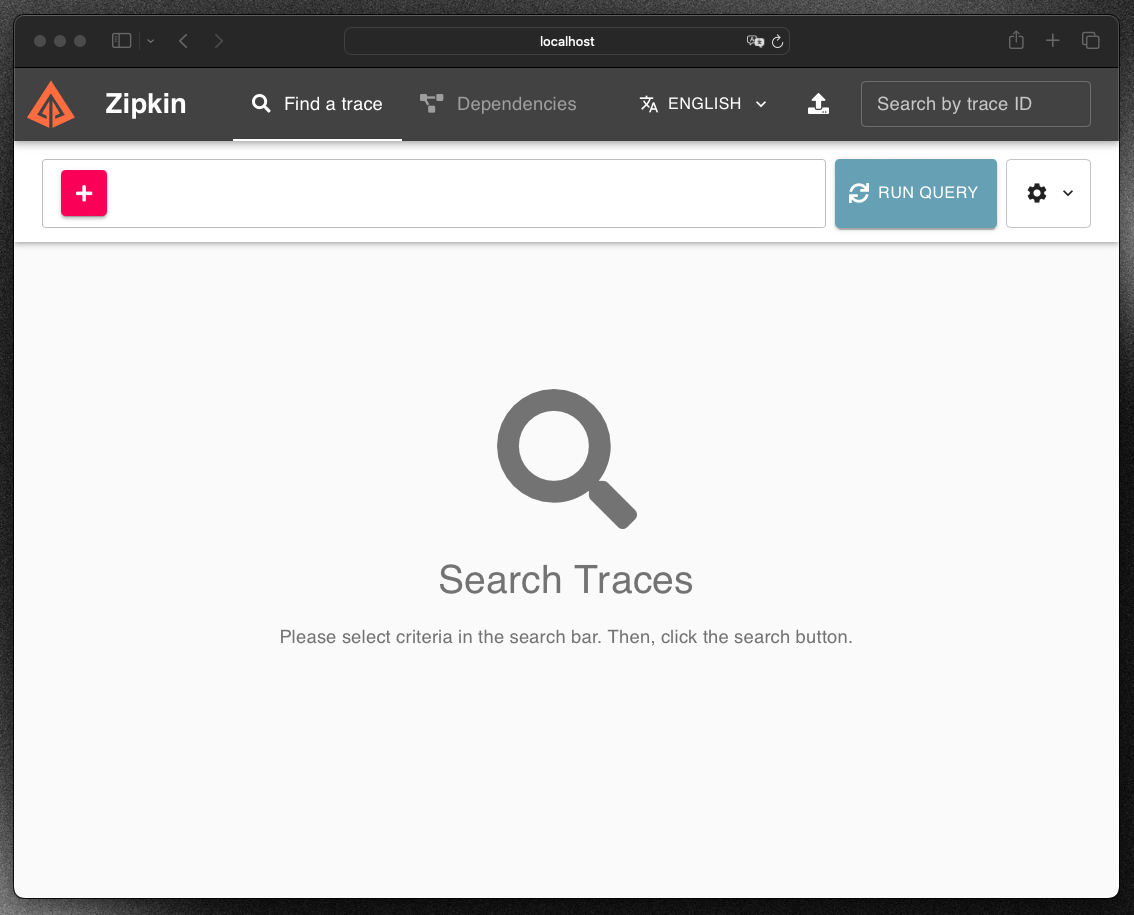 If we make a new request to our `hello` entrypoint using the RΞASON Playground and hit the `RUN QUERY` button in Zipkin, it will appear there:
 Clicking `SHOW` will open the trace:
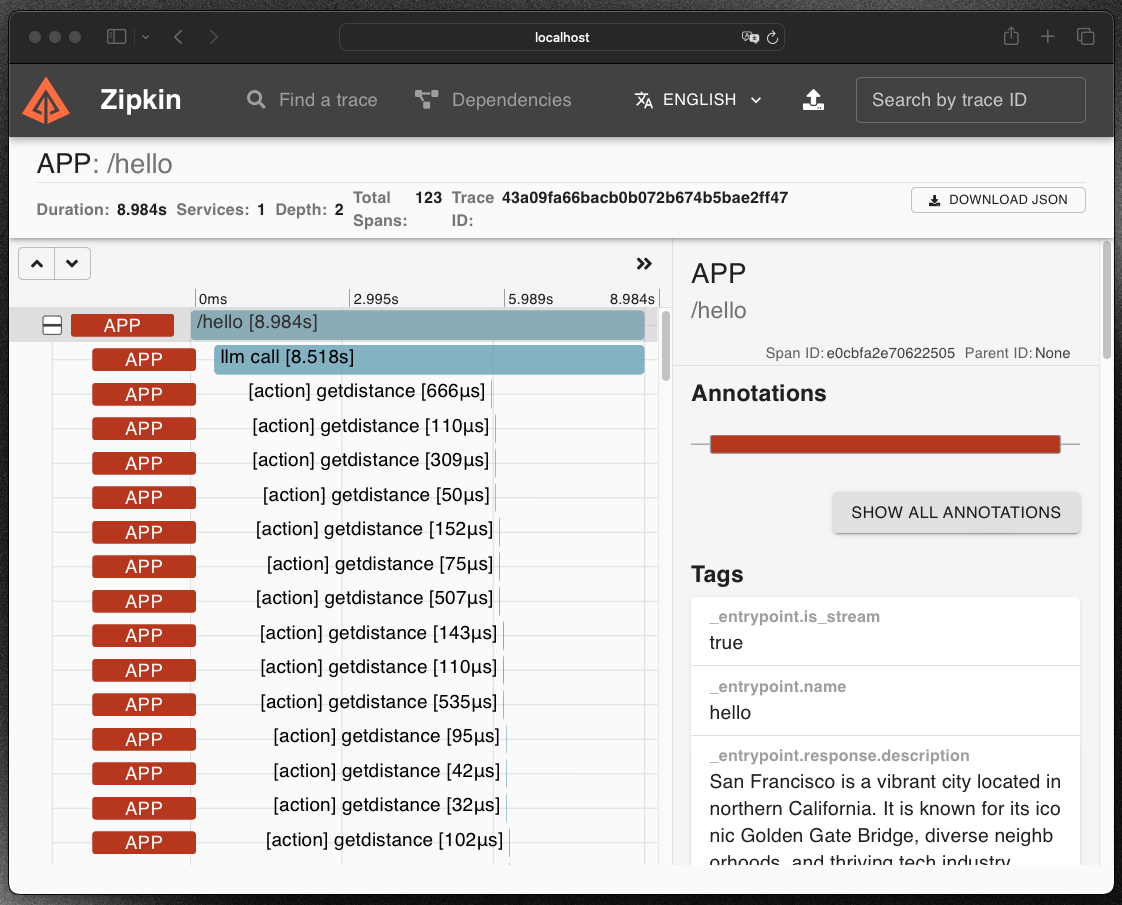 A lot is going on in the screenshot above, it shows the what happens during the call of the `POST /hello` — it is an [icicle graph](https://www.perplexity.ai/search/eli5-me-about-u8drFC.pSy2i4WTHYv4YuA?s=c).
It shows the time each thing took during your entrypoint execution. It also shows the inputs & outputs.
### Why is there many `getDistance()`?
Looking at the trace for our entrypoint we can see we are calling `getDistance()` multiple times per each `point_of_interest`. This not necessary and is wasteful because there is no need to calculate the distance of a `point_of_interest` more than once.
Try to think how you can solve that.
In any case, a solution is below:
```ts src/entrypoints/hello.ts theme={null}
import { reasonStream } from 'tryreason'
import getDistance from '../actions/getDistance'
interface City {
// ...
}
export async function* POST() {
// ...
for await (const cityInformation of reasonStream(`Tell me about ${city}`)) {
if (cityInformation.points_of_interest.value) {
for (let point_of_interest of cityInformation.points_of_interest.value) {
if (!point_of_interest.value.distance && point_of_interest?.value?.address?.done) {
/* 👆 Added this new check to make sure
that we **only** calculate the distance
if this point_of_interest has not calculated
its distance before. */
// ...
point_of_interest.value.distance = getDistance(lat, lon, poiLatitude, poiLongitude)
}
}
}
// ...
}
}
```
***
# Conclusion
This was the RΞASON quickstart, in it you learnt the fundamentals behind RΞASON. There's **a lot** more to learn though — agents & observability are two key features of RΞASON.
Be sure to save the code you created during this walkthrough as it will be utilized during the rest of RΞASON's docs.
Next we'll go in-depth about some of the fundamentals of RΞASON — starting with [entrypoints](/docs/essentials/entrypoints).
A lot is going on in the screenshot above, it shows the what happens during the call of the `POST /hello` — it is an [icicle graph](https://www.perplexity.ai/search/eli5-me-about-u8drFC.pSy2i4WTHYv4YuA?s=c).
It shows the time each thing took during your entrypoint execution. It also shows the inputs & outputs.
### Why is there many `getDistance()`?
Looking at the trace for our entrypoint we can see we are calling `getDistance()` multiple times per each `point_of_interest`. This not necessary and is wasteful because there is no need to calculate the distance of a `point_of_interest` more than once.
Try to think how you can solve that.
In any case, a solution is below:
```ts src/entrypoints/hello.ts theme={null}
import { reasonStream } from 'tryreason'
import getDistance from '../actions/getDistance'
interface City {
// ...
}
export async function* POST() {
// ...
for await (const cityInformation of reasonStream(`Tell me about ${city}`)) {
if (cityInformation.points_of_interest.value) {
for (let point_of_interest of cityInformation.points_of_interest.value) {
if (!point_of_interest.value.distance && point_of_interest?.value?.address?.done) {
/* 👆 Added this new check to make sure
that we **only** calculate the distance
if this point_of_interest has not calculated
its distance before. */
// ...
point_of_interest.value.distance = getDistance(lat, lon, poiLatitude, poiLongitude)
}
}
}
// ...
}
}
```
***
# Conclusion
This was the RΞASON quickstart, in it you learnt the fundamentals behind RΞASON. There's **a lot** more to learn though — agents & observability are two key features of RΞASON.
Be sure to save the code you created during this walkthrough as it will be utilized during the rest of RΞASON's docs.
Next we'll go in-depth about some of the fundamentals of RΞASON — starting with [entrypoints](/docs/essentials/entrypoints).